Arcade Machine Restoration Primer: Difference between revisions
mNo edit summary |
mNo edit summary |
||
| (3 intermediate revisions by the same user not shown) | |||
| Line 58: | Line 58: | ||
<br> | <br> | ||
5) Arcade Harness + Edge Connector - The power cables run from the PSU to the edge connector, power the game board and the game board then sends the sound and video signals out to the speakers and arcade monitor chassis. A pic of an arcade Harness is below: | 5) Arcade Harness + Edge Connector - The power cables run from the PSU to the edge connector, power the game board and the game board then sends the sound and video signals out to the speakers and arcade monitor chassis. A pic of an arcade Harness is below: | ||
<br> | <br> | ||
<br> | <br> | ||
| Line 70: | Line 69: | ||
<br> | <br> | ||
6) Arcade Monitor Chassis - The Arcade Harness will send the video signals to this chassis, which in turn sends them on to the arcade monitor for display. A pic of the chassis in my Neo Geo machine is here. This one was sourced from our forum monitor guru Jomac, you can find him in the sponsor section here. | 6) Arcade Monitor Chassis - The Arcade Harness will send the video signals to this chassis, which in turn sends them on to the arcade monitor for display. A pic of the chassis in my Neo Geo machine is here. This one was sourced from our forum monitor guru Jomac, you can find him in the sponsor section here. | ||
<br> | <br> | ||
<br> | <br> | ||
| Line 89: | Line 87: | ||
<br> | <br> | ||
Pinout - As mentioned above, the different arcade boards have different pinouts. Jamma being the most common. Here is a pic of the pinout of a jamma harness. | Pinout - As mentioned above, the different arcade boards have different pinouts. Jamma being the most common. Here is a pic of the pinout of a jamma harness. | ||
<br> | <br> | ||
<br> | <br> | ||
| Line 102: | Line 99: | ||
<br> | <br> | ||
It looks like the following item: | It looks like the following item: | ||
<br> | <br> | ||
<br> | <br> | ||
| Line 108: | Line 104: | ||
<br> | <br> | ||
<br> | <br> | ||
When the arcade machine is on, you do not want to be touching this area. Always have the arcade machine turned off and unplugged whilst working on the machine. If you have to remove this cap for any reason, do a lot of reading on | When the arcade machine is on, you do not want to be touching this area. Always have the arcade machine turned off and unplugged whilst working on the machine. If you have to remove this cap for any reason, do a lot of reading on [[Arcade_Machine_Restoration_Discharge_A_Monitor|Discharging A Monitor]] before doing anything. It is not difficult, just a few things to be careful of is all. | ||
<br> | |||
<br> | |||
'''Addendum:''' | |||
<br> | |||
<br> | |||
[[File:Arcade restoration cabinet monitor 01.jpg]] | |||
<br> | <br> | ||
<br> | <br> | ||
Latest revision as of 12:31, 22 February 2013
Arcade Machine Primer
Author: knight76
Forum Thread: Arcade Machine Primer
I thought it would be good to have something for people new to the arcade hobby to read and help them get a jump on the learning curve that you face when starting out. One of the hardest things is understanding the terms used, and how each part relates to each other within an arcade machine. I remember before I got in to the hobby my imagination ran wild with what was on the inside of a cabinet, all sorts of wonderful things. To my surprise when I investigated with a bit more seriosity (my word, I patented it) inside the cabinet was just a bunch of wires and dusty old, electronic components that looked like they would electrify me at my first touch.
The reality of course is they are fairly simple machines that have a few components that work together to play those awesome games we love. So to hopefully help some people new to the hobby I put this together.
This primer is not going to cover every variation of a possible scenario but will provide the basics of how an average arcade machine works. There is some jargon that is thrown around and below are the most common words to be aware of.
Common Terms
- Cab - Arcade cabinet, not a taxi lol. Cocktail = Tabletop, Upright = Larger 6' in size, Lowboy = medium height around 4-5' in height.
- Control Panel - Just the section of the arcade machine that holds the joysticks, buttons or other controls.
- Arcade Screen (Monitor or Tube) - Just the TV tube in the cabinet. They come in several types and brands. Most arcade games work on 15khz monitors, some work on 24khz and others work on 32khz. But 15khz is by far the most common. Requires a Chassis to be of any use.
- Monitor Chassis - This is a PCB that is normally affixed to the side of the machine. Cables then run from this up to the monitor. This takes the video output from the game board, and allows it to be displayed on the Arcade Monitor.
- Switching Power Supply (PSU) - This is the power supply that provides +5v, -5V and +12+ to arcade PCB's.
- Step Down Transformer - Most arcade Chassis run on 110V. The power out of the wall in Australia is 240v. So the step down transformer takes this 240V and transforms it in to the 110v the arcade Chassis requires. Also called an Isolation Transformer.
- Arcade PCB's - Just the game boards that you plug in to an edge connector to allow the game to run in the cab.
- Arcade Harness - This is the collection of wires that run from the game board to the different components within the machine. Jamma is the most common harness used.
- Edge Connector - This is the physical interface between the game board and the jamma harness. The Game Board plugs in to this.
- Jamma - This refers to the pinout that a game board uses to connect to the rest of the arcade machine. A Jamma game board will have 28 gold looking pins on the top and bottom side of the game board. Each side has it's own pins and functionality and plugging the game board in upside down will likely do big damage to the game board. More on this below
- Ground - This is the earth for all the metal parts of the cabinet as well as allowing all of the switches to work correctly. On the PSU there is a ground connector labeled "FG", this ground wire runs back out of your cab and to the wall socket and is used to ensure all of your metal components are grounded. The coin door, control panel, power supply and step down transformer will all likely be connected to this ground circuit. There is also a Ground on the arcade harness and this connects to the power supply connector labeled "GND". This is the ground used by all of the switches and electonic components for your cabinet through the arcade harness.
These are the main basic terms to be aware of and cover the most common components of an arcade machine.
So, how does an arcade machine work?
1) Out of the wall socket comes the 240v power and this enters the machine and generally goes through a switch. It also generally goes through a fuse also. It is important to remember that any time you are working on a machine it should be switched off and unplugged, unless of course you are adjusting the monitor picture.
2) From here the power cables often run's to a distribution box that distributes the power to various parts of the cabinet. A common looking distribution box is below:
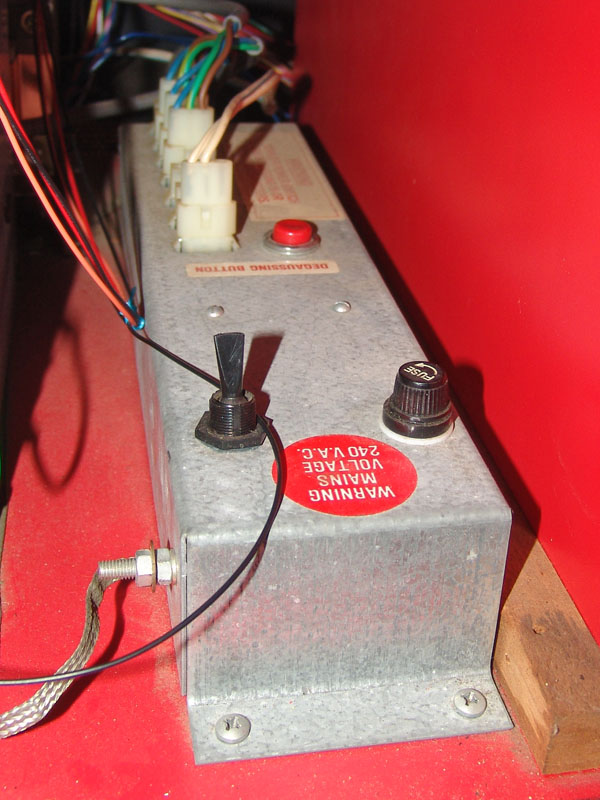
Notice there is a fuse and a switch. Often the power enters the cab and goes straight to the distribution box. Note the multiple white plugs at the back of the distribution box. These are the outputs that send the power to the other components in the cab. Also note the metal braid wire that is coming from the left of the distribution box, often cabinets use these as a ground wire throughout the cab. Typically components are screwed down on to the braiding to ensure they are grounded.
From the distribution box the power typically runs to a step down transformer and switching power supply.
3) Step Down Transformer - As mentioned above this converts the 240v from the wall outlet to 110v that the monitor chassis uses. The stereotypical step down transformer is pictured below:
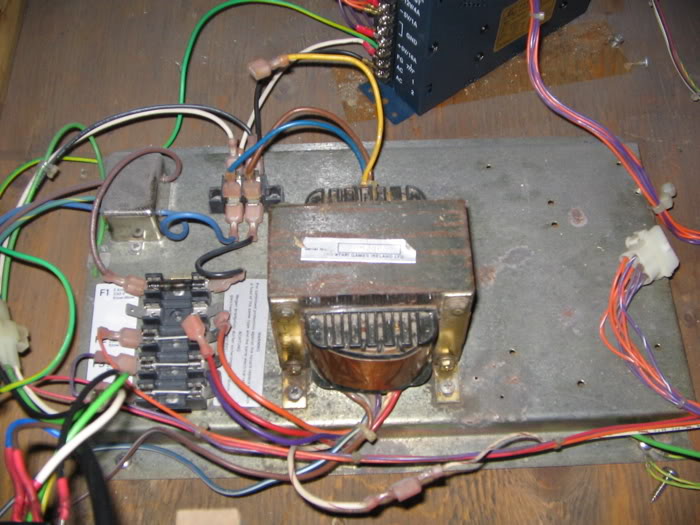
There are sometimes additional fuses on the cables carrying power as in this picture, to the left. The power coming out of this step down transformer will run directly to the monitor chassis.
4) Switching Power Supply (PSU) - These take the higher voltage power and convert it in to low voltage power the game board, and other parts of the cabinet require. Typical power voltages are +5v, -5v and 12v. A picture of a typical looking power supply is below:
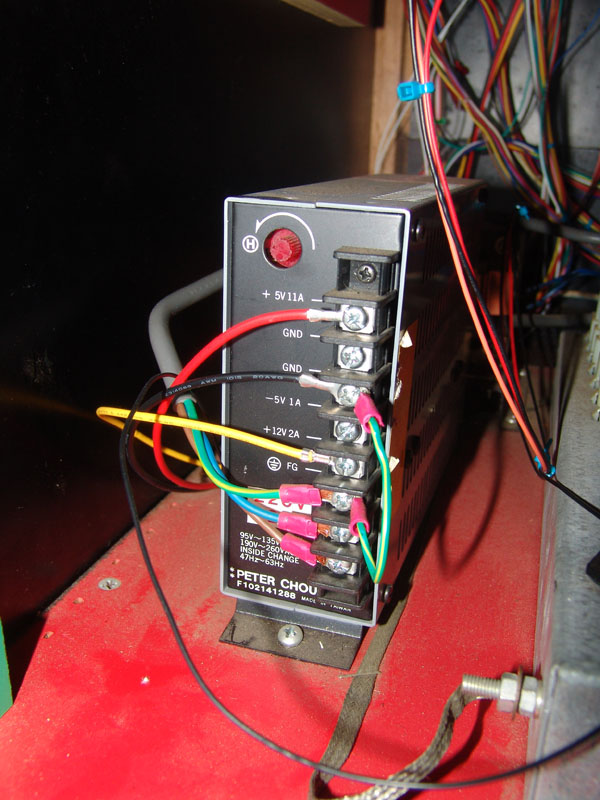
Each cable is usually connected to the out/inputs via a connector. Sometimes you will see them soldered directly to the out/inputs. The PSU will have writing next to each connector to explain what it does. The bottom three are usually 240vac, and the Ground. The rest are usually outputs for the +5v, -5v and +12v cables that run to the jamma harness edge connector to power the game board.
There is usually a way to adjust the voltage on the 5v output, this one is via the red knob that can be turned to adjust the voltage up or down.
5) Arcade Harness + Edge Connector - The power cables run from the PSU to the edge connector, power the game board and the game board then sends the sound and video signals out to the speakers and arcade monitor chassis. A pic of an arcade Harness is below:
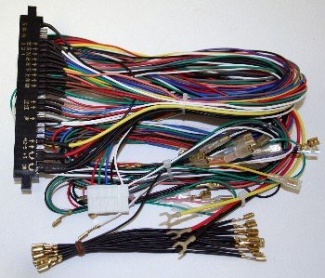
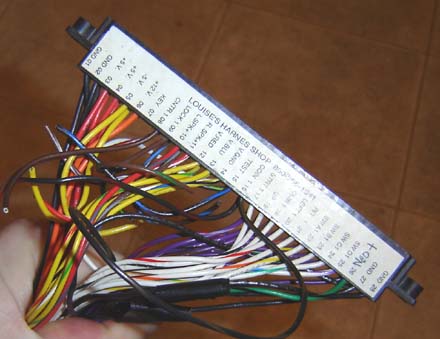
The cables leading from the edge connector will be quite long, they have to go to all parts of the cabinet. Often the edge connector will be labeled for what each pin does.
6) Arcade Monitor Chassis - The Arcade Harness will send the video signals to this chassis, which in turn sends them on to the arcade monitor for display. A pic of the chassis in my Neo Geo machine is here. This one was sourced from our forum monitor guru Jomac, you can find him in the sponsor section here.
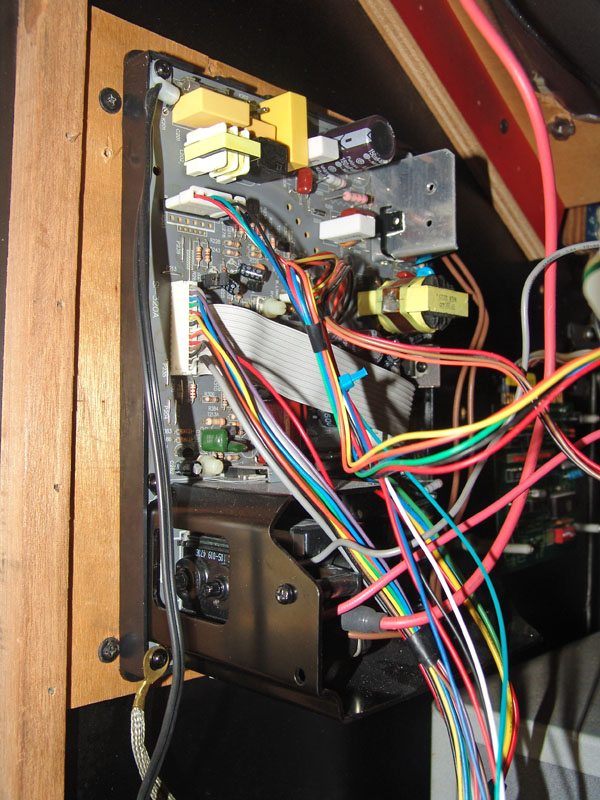
The Chassis will have 2 main adjustor knobs. One with "Screen" on it, and the other "focus" Screen adjusts the brightness of the display and focus is self explanatory. There may also be additional adjustments able to be performed on the chassis. These are usually done via small knobs that can be adjusted with a small screwdriver.
7) Game PCB - The game board that plugs in to the arcade harness. Sometimes these are cartridges like with the Neo Geo, in these cases they plug in to a motherboard, which in turn plugs in to the arcade harness. The game boards use gold colored pins that push in to the edge connector, these pins each perform an action. The game board will use a certain "pinout" and the arcade harness needs to be wired correctly for that pinout.
Jamma is the most common pinout used but many variations exist, even unique pinouts to one or only a handful of games. Often a non-jamma game board will come with a Jamma adaptor to allow it to run in jamma wired cabinets.
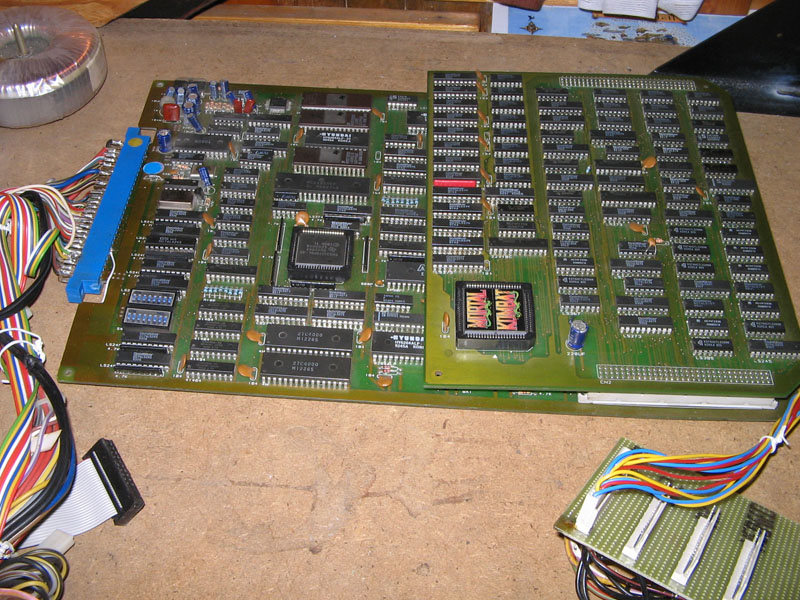
This is a Game Board plugged in to a Jamma Harness. Remember, be careful to make sure you plug the game board in the correct way. Normally the side containing all the components is called the parts side, and the solder side is called the er, solder side. It's a good idea to mark or label the edge connector of the arcade harness with what side it is for.
Pinout - As mentioned above, the different arcade boards have different pinouts. Jamma being the most common. Here is a pic of the pinout of a jamma harness.
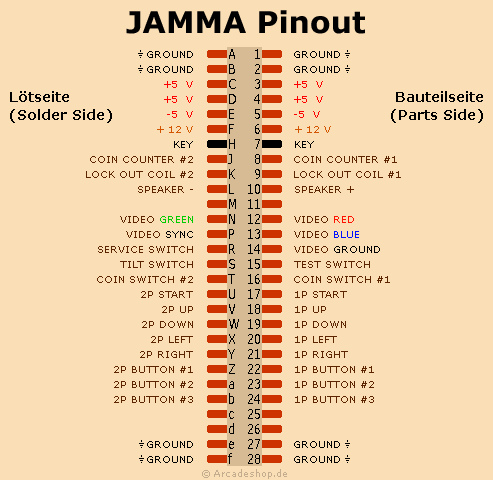
Each of these entries needs to correspond to the pin on the arcade board.
Remember - Any time you are working on an arcade machine, turn it off and unplug it. These arcade machines in certain areas can carry lethal voltages, better to be safe than sorry.
Anode Cap - I thought I would include this also. The Anode Cap is the rubber suction cup looking thing attached to the outside of your arcade monitor. There will be a thick cable running from this to the chassis area, specifically the fly back transformer.
It looks like the following item:
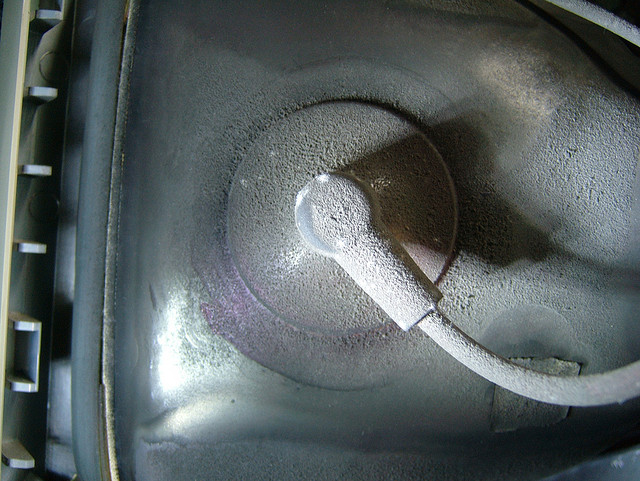
When the arcade machine is on, you do not want to be touching this area. Always have the arcade machine turned off and unplugged whilst working on the machine. If you have to remove this cap for any reason, do a lot of reading on Discharging A Monitor before doing anything. It is not difficult, just a few things to be careful of is all.
Addendum:
